Client usage
Starting the ThinLinc client is normally easy, but the method can differ somewhat between the available operating systems. See Installation for instructions on how to start the client on different platforms.
The started ThinLinc client
When the ThinLinc client is started it will show the login window. This window contains a ThinLinc logo, text fields where needed information can be entered, buttons for control and at the very bottom a status field that gives information about the login procedure.
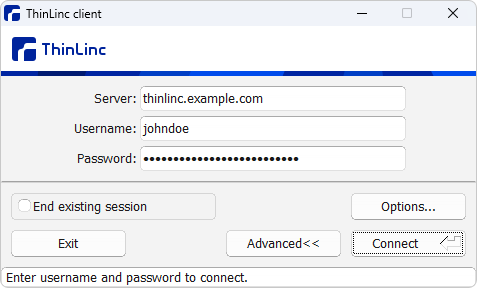
Fig. 6 The ThinLinc client login window
Logging in to a ThinLinc server
To log in to a ThinLinc server, the client needs to do a successful user authentication. This means that it needs to tell the ThinLinc server a username and a corresponding authentication information (a password or an encryption key). The ThinLinc server controls that the information is valid and accepts or denies the login attempt.
The information the client must know to successfully log in the user to a ThinLinc server is a server address, a username and the corresponding authentication information. When the client is started it will display two text fields labeled Server and Name, and one text field labeled Password, Key or Certificate. This may differ depending on command-line arguments.
Accepted values for the server field is the hostname or the IP address of the server. The name field should be filled in with the ThinLinc username. The authentication information needed depends on the type of authentication used:
For password authentication, a plain text password should be entered. The password won’t be shown as clear text when entered.
For public key authentication, the path to an encryption key must be entered or browsed to using the … button.
For smart card authentication, a certificate must be selected in the dropdown menu.
The server name, username, key path and certificate name are saved when the user tries to start the session, so they don’t have to be entered again each time a new session is wanted.
When the user has entered the server address, username and authentication information, it is possible to log in. This is done by pressing the Connect button or the Enter key on the keyboard. The client will then try to establish a connection with the ThinLinc server. If any of the fields has a bad value that prevents the client from successfully logging in, for example if the username or password is incorrect, there will be a response message shown as a message box with the relevant information.
Note
By default, usernames are case-sensitive when logging in via the
ThinLinc client. This behavior may be changed using an option in the
client configuration file — see LOWERCASE_LOGIN_NAME
in Client configuration parameters for details.
If the login attempt is successful a ThinLinc session will start, an old one will be reused or a session selection box might be presented, all depending on the client’s settings and how many sessions the user has running. See Advanced tab for more information on how the choice is made.
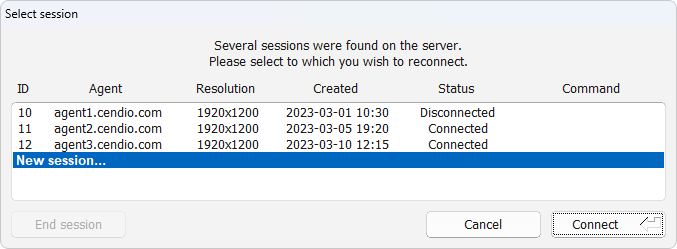
Fig. 7 The ThinLinc client session selection window
The session selection window presents the user with a list of relevant sessions and several buttons to act on those sessions:
- Connect
Connect to the selected session, or create a new session if the current selection is Create new session….
- End session
Forcefully terminate the selected session and restart the connection procedure.
- Cancel
Abort the connection and return to the main window.
The server will then prepare a graphical session on a ThinLinc server. The client then connects to this session and displays it. Normally the user now sees a dialog with different session options. The user can there select for example to run a Linux session or a Windows session. Depending on the choice the server at the other end will start that kind of session.
Language settings
The ThinLinc client gets all its strings from a database. This way it can be easily translated, by just providing a new database for a new language.
On Linux-based systems, the client picks up which language to use by reading the standard POSIX locale environment variables:
- LC_ALL
If this environment variable is set, it takes precedence over all other locale variables. It will affect all locale settings, including message strings, sorting order, money representation, decimal numbers, etc.
- LC_MESSAGES
If LC_ALL is not set but this one is, it will make the messages of the client adhere to the language in question, in effect making the client use that language. There are several other variables of this kind, but they do not affect the ThinLinc client.
- LANG
If LC_ALL is not set then the value of this variable will be used for all locale categories that are not explicitly set, e.g. LC_MESSAGES.
There is also a variable called LANGUAGE on some systems, but it is non-standard, and we do not recommend the use of it.
If none of these variables are set, the locale defaults to C, which
in practice means American English. The value of the variables should be
of the form language_country, where language and country
are 2-letter codes. Currently, the languages delivered with the client
are Brazilian Portuguese (pt_BR), English (en_US), Dutch
(nl_NL), French (fr_FR), German (de_DE), Italian
(it_IT), Russian (ru_RU), Spanish (es_ES), Swedish
(sv_SE), and Turkish (tr_TR).
On Windows, the same environment variables can be set in a script that
also starts the ThinLinc client. An example script called
altlang.cmd is installed with the ThinLinc client for Windows.
If nothing is set, the Windows client will use the language setting that
was given with the control panel.
The ThinLinc session life cycle
When the user has started a ThinLinc session the client login interface disappears from the desktop. The client program continues to run in the background as long as the ThinLinc session is running. The client enters a service mode where it handles services needed to fulfill the requested features. For example the client handles the export of local printers, drives, and so on. When the ThinLinc session quits the client service engine quits as well.
There are several ways a session can end. The most common one is that the user chooses to log out from the session. That causes the session to finish on the server side. The ThinLinc server finds out that the session has finished and disconnects the client. Another possibility is to intentionally disconnect the client, without finishing the session on the server. This can be done by using the session menu. See The session menu below for information about how to do this. When the client disconnects before the session running on the server is told to end, then the session will continue to run on the server. The next time the user logs in the server will reconnect the user to the very same session. This way it’s possible to, for example, disconnect a session at work, go home, reconnect to that session and continue to work.
If the user knows that there already is a session running on the server, but still wants to start a new fresh session, then it’s possible to check the End existing session check box that exists in the client login interface (advanced mode only). The client will then tell the server that it wants to end the existing session (if it exists) and get a new one.
Network issues or problems with ThinLinc services can sometimes prevent the servers from checking the status of a session. Such a session will be considered unreachable and the client will not be able to reconnect to it. The user can choose to abandon the session or wait for the problem to be resolved. However, abandoning the session causes the ThinLinc server to stop tracking it and can leave applications running without any way of reaching them.
