Optimization tab
The Optimization tab contains various settings that affect the protocols used to transfer the graphic information. This includes the algorithm used for the graphic encoding. The best choices may differ from case to case. Factors that affect the algorithm choices can for example be network bandwidth, network latency, and client computer performance.
The default setting is to use the Auto select mode, to automatically select the best suited algorithms.
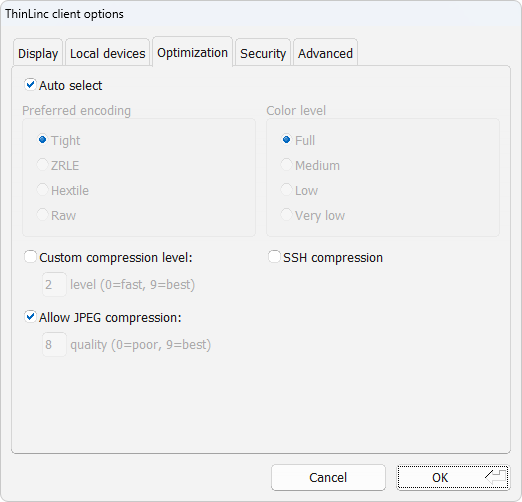
Fig. 13 Client settings optimization tab
Description of optimization tab settings
Here follows a detailed description of the settings available in the optimization tab.
- Auto select
This option makes the ThinLinc system try to automatically select the best suited encoding algorithm. The network performance is measured during the life of the connection and the encoding options are adjusted based on the results. This means that the encoding options can be changed automatically during the connection, if the network performance changes. Activating this option will “gray out” the Preferred encoding and Color level options, to show that they aren’t manually controlled.
- Preferred encoding
This block of settings affects the VNC protocol encoding. There are several different ways to compress and encode the graphic data that is sent from the server to your client. In this box you select one of four possible encodings. The methods differ much: Some try to use smart algorithms to select and compress the areas to send, which means slightly higher CPU usage, but most likely less bandwidth usage and faster sessions where the bandwidth is limited. Other methods use less CPU capacity but more network bandwidth. The best choice can vary much depending on place and situation. A safe choice is to let the system automatically select the best encoding by checking the Auto select checkbox above.
- Encoding: Tight
This choice selects the Tight encoding method. With this encoding the zlib compression library is used to compress the pixel data. It pre-processes the data to maximize compression ratios, and to minimize CPU usage on compression. Also, JPEG compression may be used to encode color-rich screen areas. The zlib compression level and the JPEG compression ratio can be manually changed. See Custom compression level and Allow JPEG compression below. Tight encoding is usually the best choice for low-bandwidth network environments (e.g. slow modem connections).
- Encoding: ZRLE
This choice selects the ZRLE encoding method.
- Encoding: Hextile
This choice selects the Hextile encoding method. With Hextile the screen is divided into rectangles, split up into tiles of 16×16 pixels and sent in a predetermined order. Hextile encoding is often the best choice for using in high-speed network environments (e.g. Ethernet local-area networks).
- Encoding: Raw
This choice selects the Raw encoding method. This is the simplest of the encoding methods. It simply sends all the graphic data of the screen, raw and uncompressed. Since this method use the least processing power among the possible methods this is normally the best choice if the server and client runs on the same machine.
- Custom compression level
By selecting this option you choose to override the standard compression level used when compressing data with the Tight encoding. You can manually select the wanted compression level by entering a number between 0 and 9. Level 0 means no compression. Level 1 uses a minimum of CPU performance and achieves weak compression ratios, while level 9 offers best compression but is slow in terms of CPU consumption on the server side. Use high levels with very slow network connections, and low levels when working over high-speed network connections. This applies to the Tight encoding only!
- Allow JPEG compression
By selecting this option you choose to override the standard JPEG compression quality of color-rich parts of the screen. JPEG is a “lossy” compression method for images that helps the Tight encoding to significantly reduce the size of the image data. The drawback is that the resulting image, depending on the selected compression ratio, can be blurred and grainy. You can manually select the image quality by entering a number between 0 and 9. Quality level 0 gives bad image quality but very impressive compression ratios, while level 9 offers very good image quality at lower compression ratios. Note that the Tight encoder uses JPEG to encode only those screen areas that look suitable for lossy compression, so quality level 0 does not always mean unacceptable image quality.
- Color level
This block of choices selects the number of colors to be used for the graphic data sent from the server to the client. The setting has four levels, Full, Medium, Low and Very low. The default and normal is to use the Full setting. Selecting a lower number of colors will highly affect the resulting image to the worse, but may also speed up the transfer significantly when using slow network connections.
In this context, Full means the number of colors supported by the client’s graphics hardware.
- SSH compression
This choice selects whether or not to use SSH compression for all the data sent between ThinLinc server and client. This is normally not used since an extra compression step, above a compressing graphic encoding normally doesn’t help making it smaller, only use more CPU performance. There can still be occasions where this is worth trying though. It is possible that this can help speed up printing or other exports over slow connections.
